Deployment
- Deployment of ink! based smart contracts
This document contains description of how to deploy and test smart contracts locally and in testnet.
Ecosystem
Polkadot doesn't support smart contract execution, only parachains can provide this functionality. More information about how it works you can find on official wiki.
The list of standalone blockchain/parachains that support ink! smart contracts:
Overview
To deploy contract you should build your own contract or get some example from Openbrush. You can find instruction how to build ink! smart contract in docs
You have to choose substrate network to deploy your contract. There are several option you have:
- Local substrate node with pallet contracts.
CanvasnetworkShibuya- Astar testnetShiden- Astar canary networkAstarmain network (will support pallet contracts in near futures)- Other networks which supports pallet contracts
Be sure that you have installed
polkadot.js.orgwallet extenstion for your browserHere you can find how to Build ink! smart contract
Let's deploy to local network
You can manuly call our deployed contract
Canvas - a Smart Contracts Parachain which was deployed on Polkadot test network - Rococo. You need to get free
ROCtoken using faucet to deploy contract to Canvas network. Finally deploy your ink! smart contract to canvasAstar - WASM + EVM Hub on Polkadot. More info about astar here
You can deploy ink! smart contract to Shibuya (astar test network). How to get free
SBYusing faucet
Build
- navigate to
./openbrush/examples/psp22 - build ink! contract using:
cargo contract build
Once the compilation is completed, a target folder is created. In this folder, under the ink subdirectory, you will be able to see a my_psp22.wasm file and a metadata.json file. my_psp22.wasm is your contract that has been compiled to web assembly and the metadata.json is a JSON abstraction of your contract.
You will find 3 files in folder ./openbrush/examples/psp22/target/ink
my_psp22.contract(code + metadata)my_psp22.wasm(the contract’s code)metadata.json(the contract’s metadata)
Install polkadot extention for your browser and create account
- Navigate to Polkadot.js.org extention tab and install to your browser. You need wallet extention to sign and submit transaction for deployment contract and manual testing via UI
- Create or import polkadot account. You need account and some tokens on that account to deploy and test contracts on test network like
Canvas,Shibuyaor main network likeShidenandAstarin near futures. How to get free tokens for test net you will find there - Please write down your wallet's mnemonic seed and keep it in a safe place. The mnemonic can be used to restore your wallet. Keep it carefully to not lose your assets.
Deployment on local network
- Substrate framework pre requisites guide
- Run a Substrate Node guide
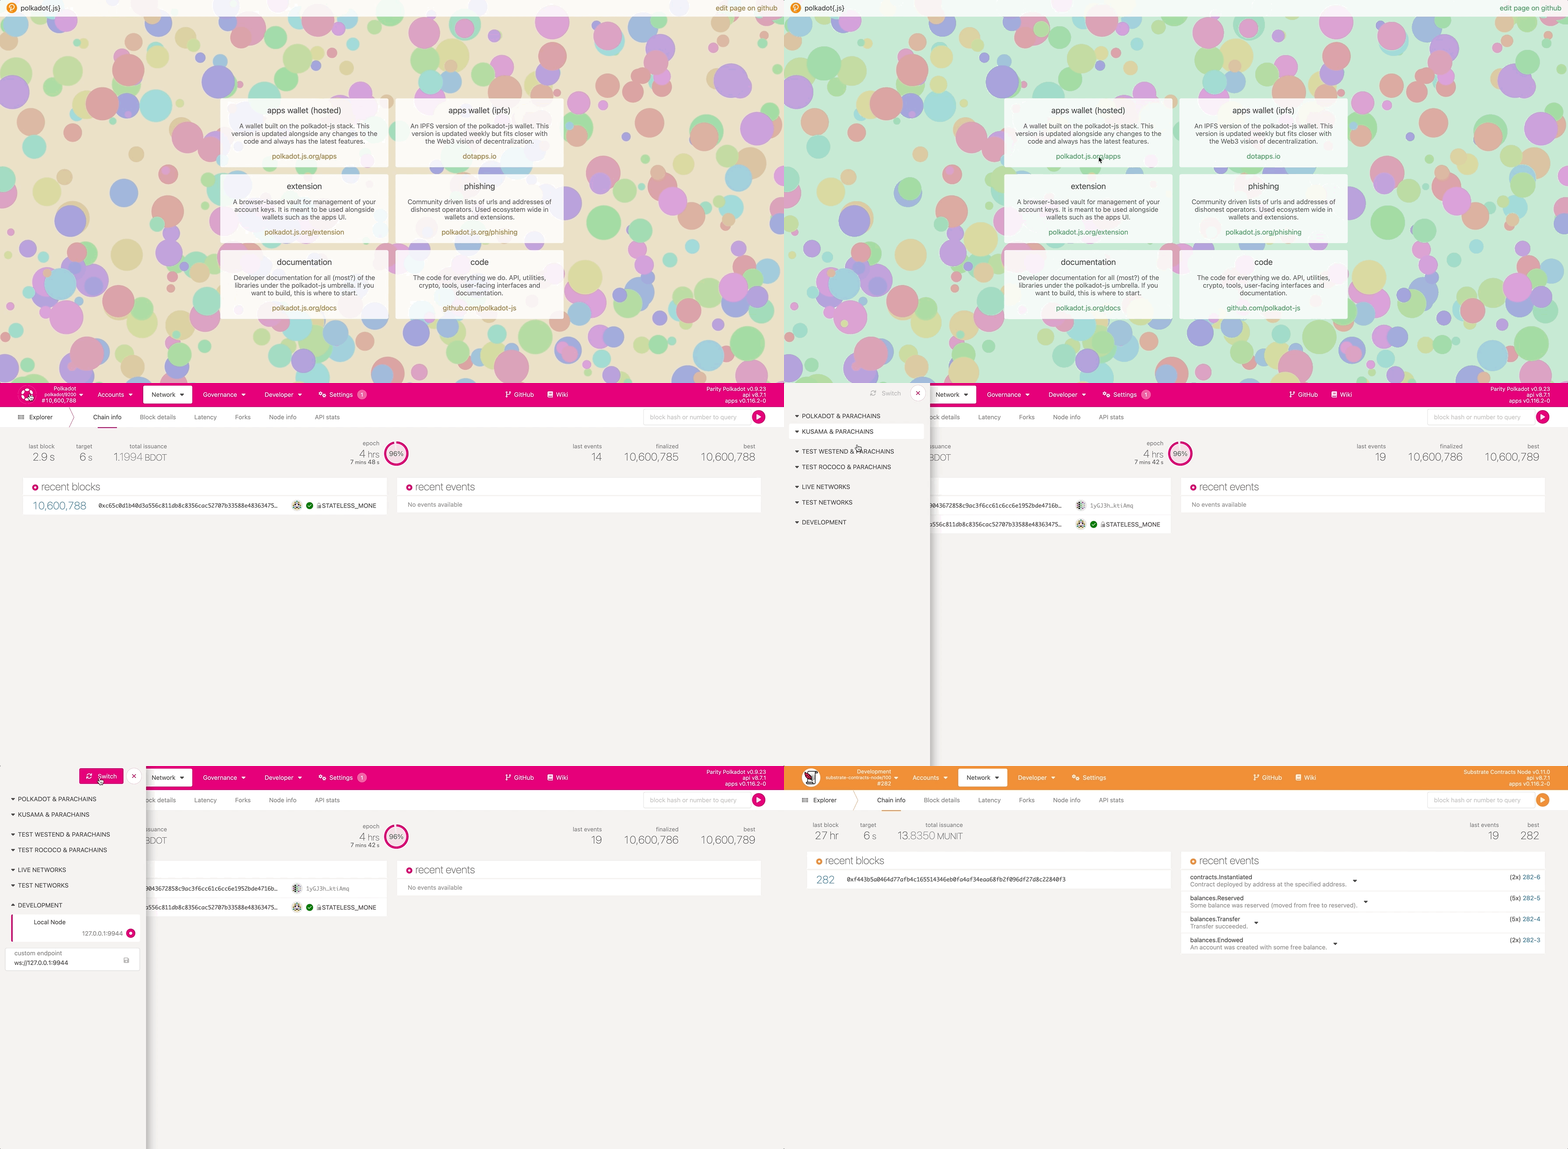
- Navigate to the Polkadot.js.org in a web browser
- Verify that you are connected to the Local Node.
Upload and deploy contract
Click
Developer->Contracts->Upload & deploy code. Specify the user account to use for deployment. Any fees will be deducted from deployment account. Upload*.contractfile.*.contractfile contains theABIfor theWASMcode. TheABIis required and stored for future operations such as sending messages. Type a descriptive name for the smart contract. Set value1000fortotalSupplywhen initialize the contract using constructor. And finally clickSign and Submittransaction.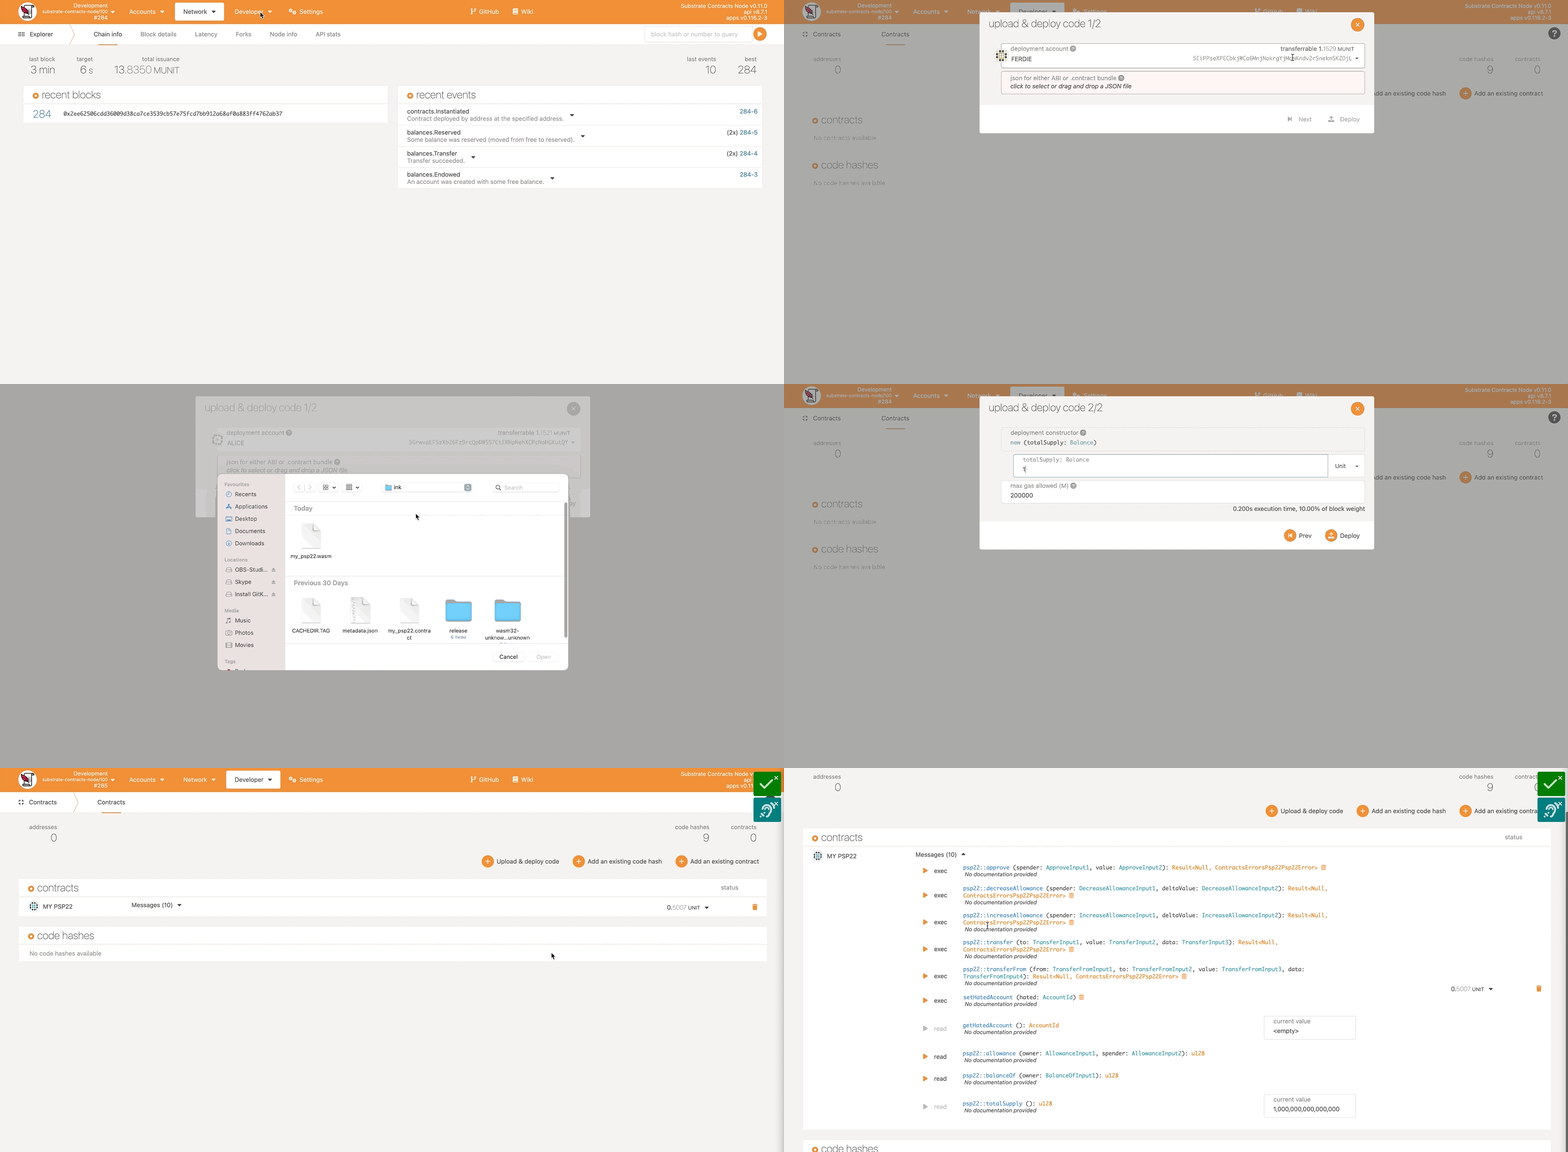
The Polkadot UI displays information about the content of the smart contract.
Depending on the account you used, you might be prompted for the account password. If you used a predefined account, you won’t need to provide a password.
Call the smart contract
Now that your contract has been deployed on the blockchain, you can interact with it. Our deployed smart contract has functions — totalSupply() and balanceOf() — and you can use the Polkadot UI to try them out.
To test the balanceOf() function:
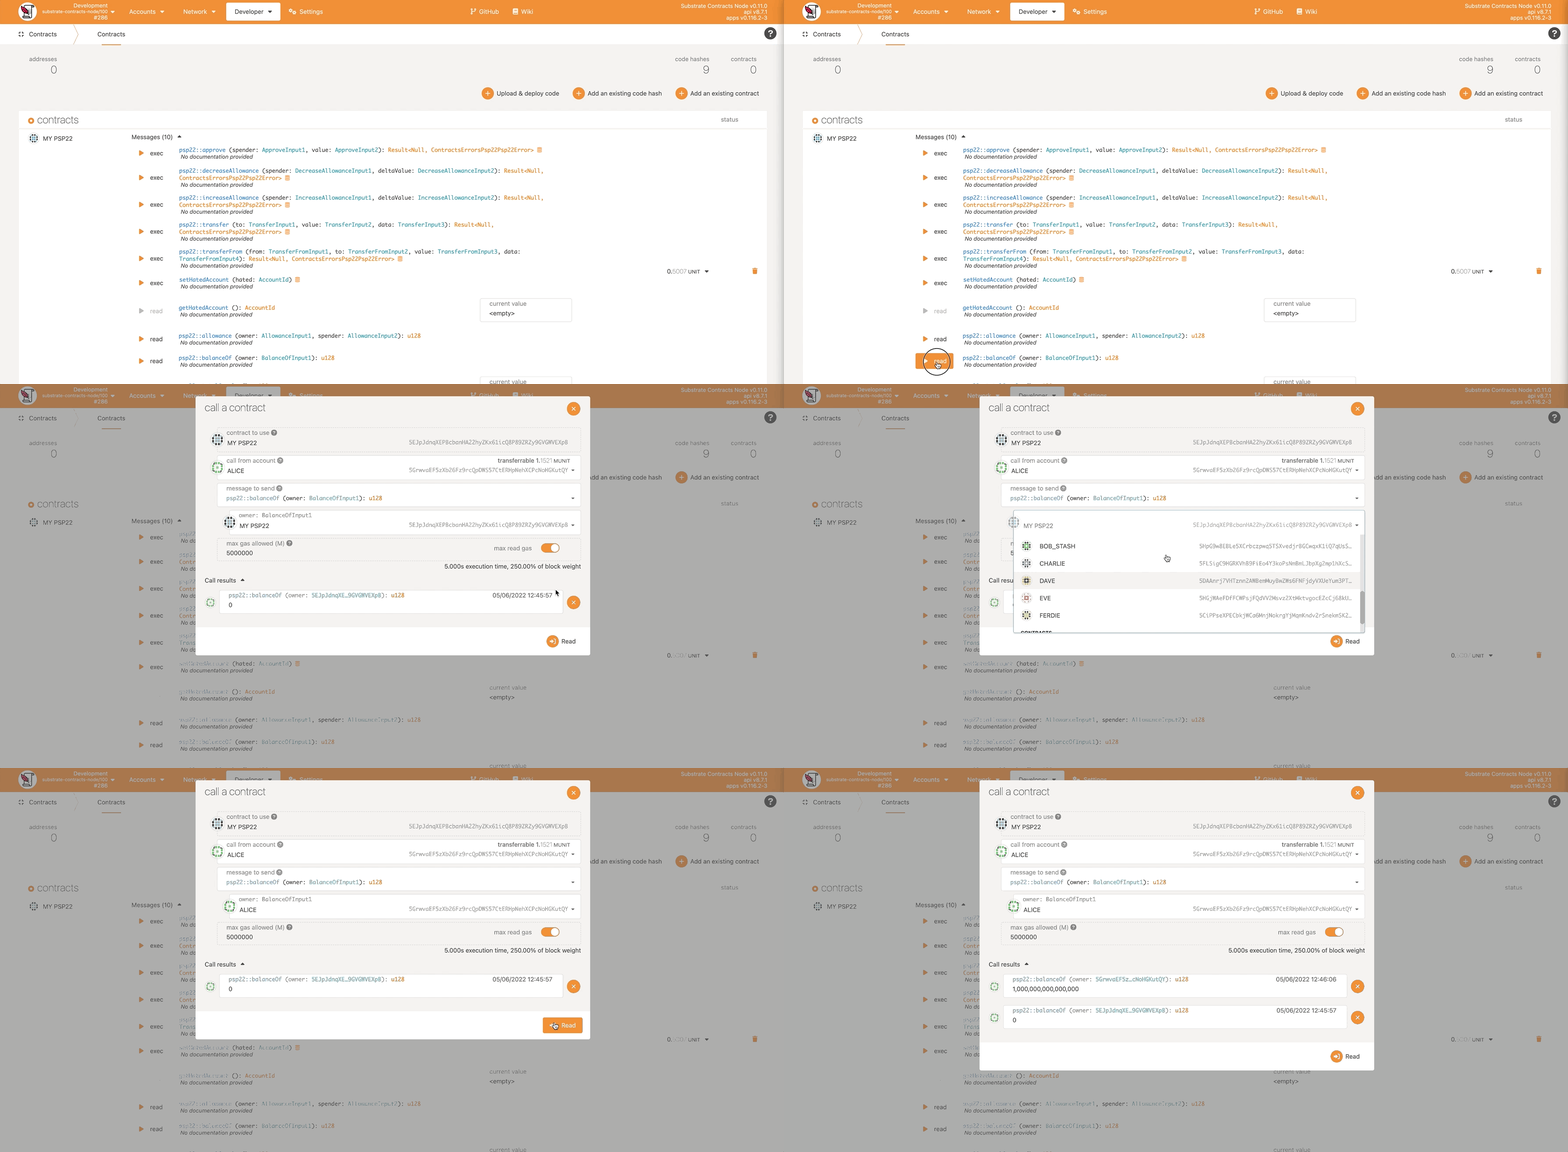
Select any account from the Account list.
This contract doesn’t place restrictions on who is allowed to send the balanceOf() request.
- Click
Read. Verify that the value1,000,000,000,000,000is returned in the Call Results.
Rococo Faucet
Canvas - parachain on Rococo ‒ a testnet for Polkadot and Kusama parachains. As a first step, you should create an account. See here for a detailed guide.
As a second step, you have to get ROC testnet tokens through the Rococo Faucet. This is a chat room in which you need to write:
!drip YOUR_SS_58_ADDRESS:1002
send message to #rococo-faucet:matrix.org
The number 1002 is the parachain id of Canvas on Rococo, by supplying it the faucet will teleport ROC tokens directly to your account on the parachain
Deploy to Canvas
- Navigate to the Polkadot.js.org in a web browser.
- Verify that you are connected to the Contracts Node.
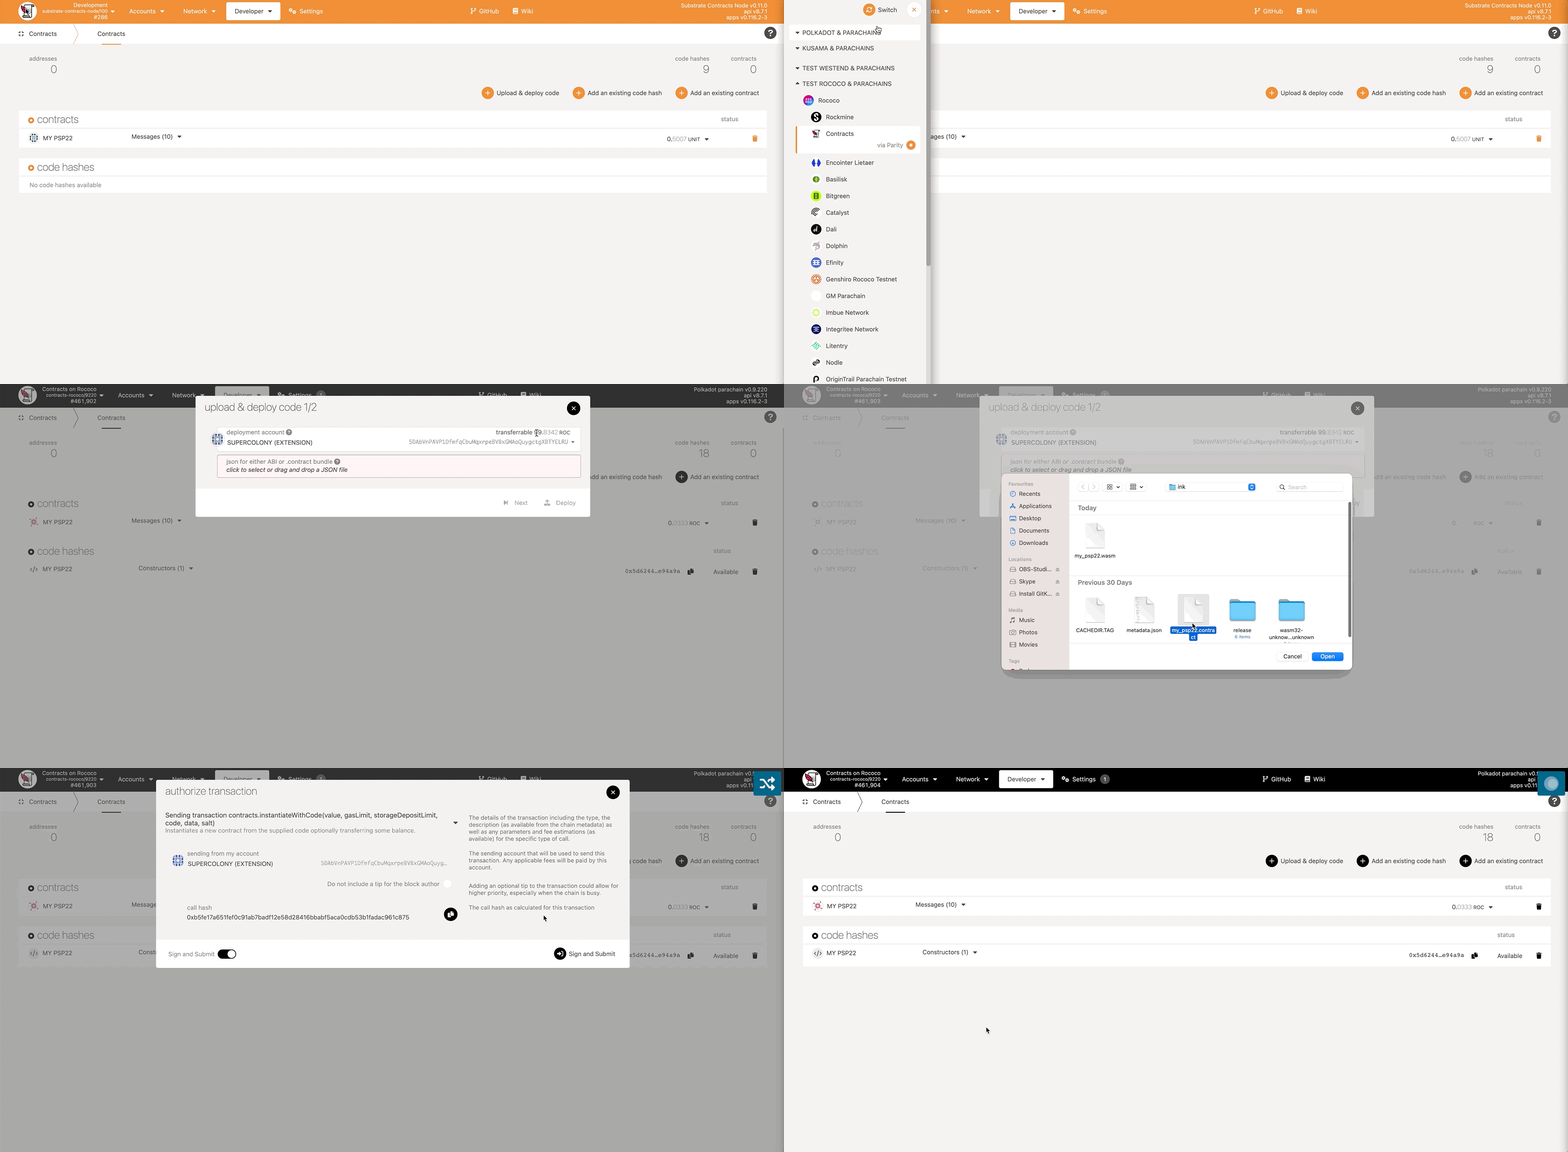
- Upload
my_psp22.contractfile the same way as to local node but we need someROCtokens - Use wallet which contains
ROCtokens
Astar
- Astar - Astar is a multi-chain smart contract platform that supports multiple blockchains and virtual machines.
- Astar/Shiden Network Family: Before starting the deployment, it's important to understand Astar/Shiden Network family. You should change the network based on what you want to do. Currently, there are 3 networks available, Shiden, Shibuya, and Local network. All networks support own standard Substrate RPC and EVM RPC.
- Astar and Shiden: Astar is the network that aims to be the parachain of Polkadot. Shiden is the sister network of Astar which is the parachain of Kusama. Basically, Astar and Shiden share the same code base. The biggest difference is the economic impact.
Please note that Shiden has its real economic value. So you need to pay in SDN, the native token of Shiden, when you execute transactions. You can buy SDN on crypto exchanges.
- Shibuya: Shibuya is the test network of Shiden and is connected to our own Relaychain. So Shibuya behaves almost the same as Shiden. Any new features are tested on Shibuya first and then deployed on Shiden. SBY, the native token of Shibuya, has no economic value and is available through our faucet. The best practice is to testing smart contract on Shibuya before deploying it on Shiden to check whether your smart contract works well or not.
- Astar local Network: Here is tutorial how to run local network
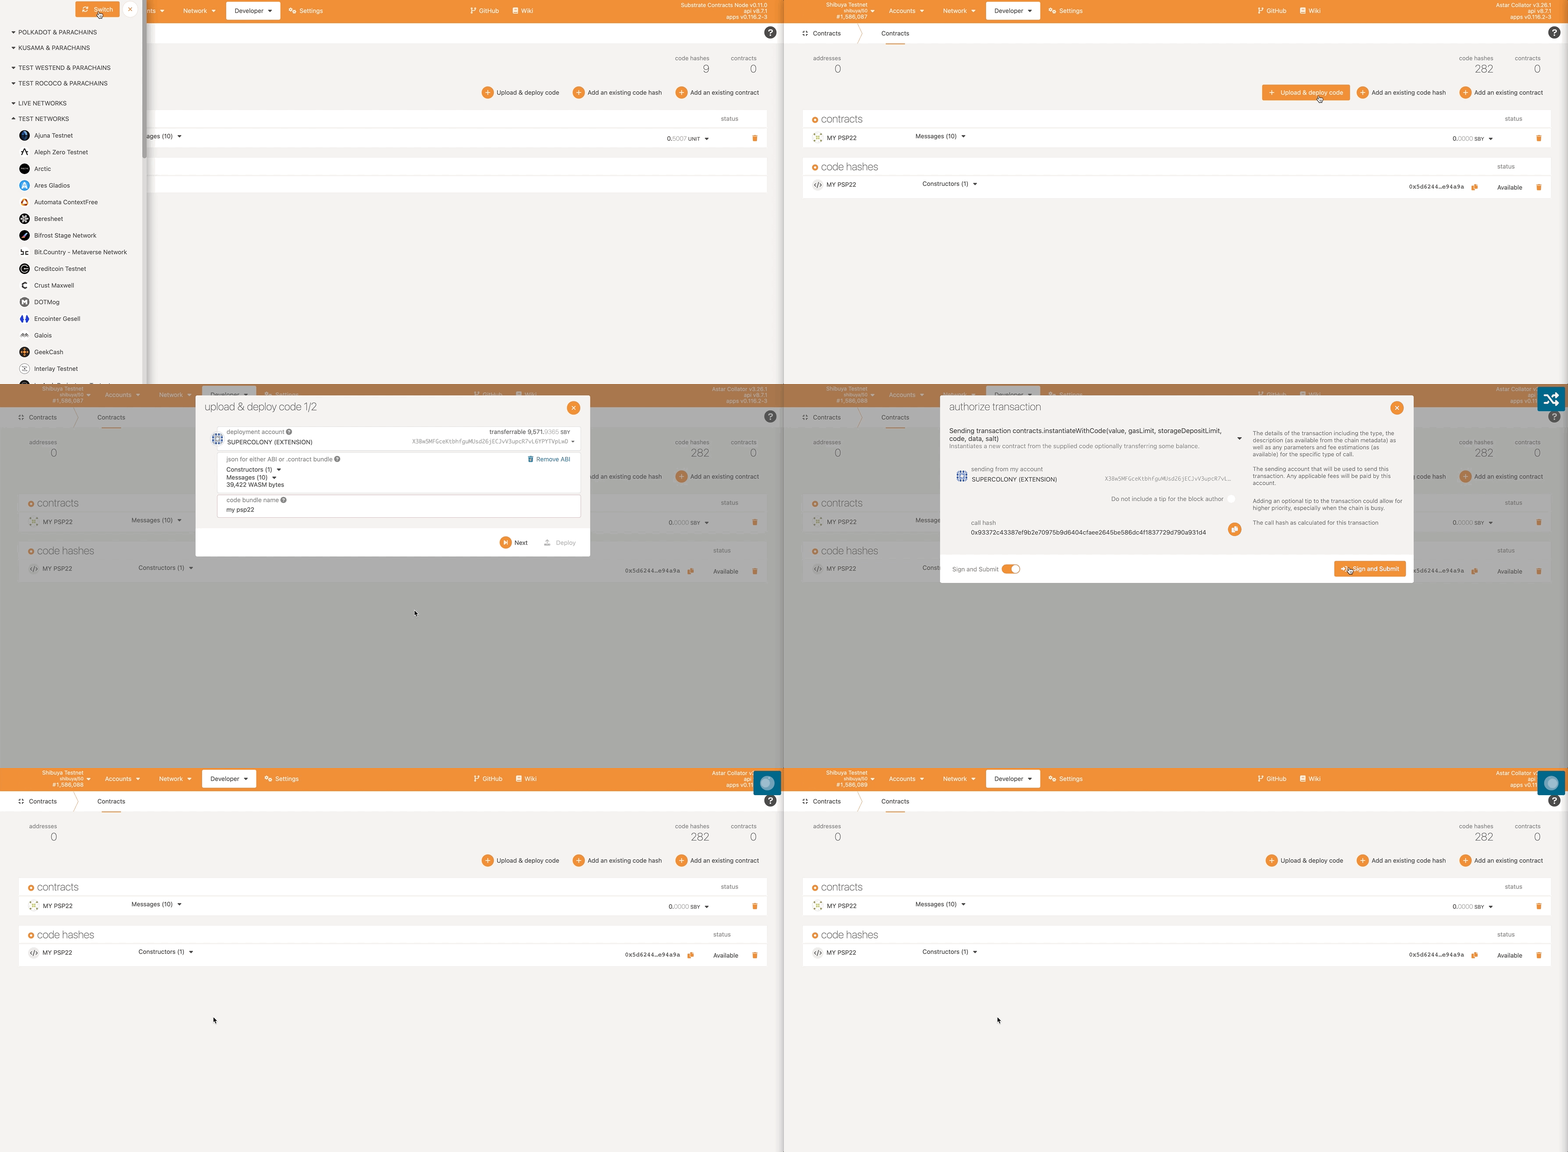
Deploy to Shibuya
- Build smart contract the same way as for local node
- Be sure that you have polkadot wallet exension in your browser
- Create polkadot account if not have yet
- Use Faucet to get free SBY token
- Go to polkadot.js.org
- Switch network to Shibuya and deploy contract
We use “messages” to communicate with smart contracts.
There are 2 types of messages:
- messages that change a smart contract’s state should be sent as transactions
- messages that don’t change a state can be made by using RPC calls
Next, let’s change the smart contract state by sending a transaction that calls the transfer() function.
As expected, the value that was stored in the smart contract changed from 0 to 1 after the transfer() transaction is successfully executed
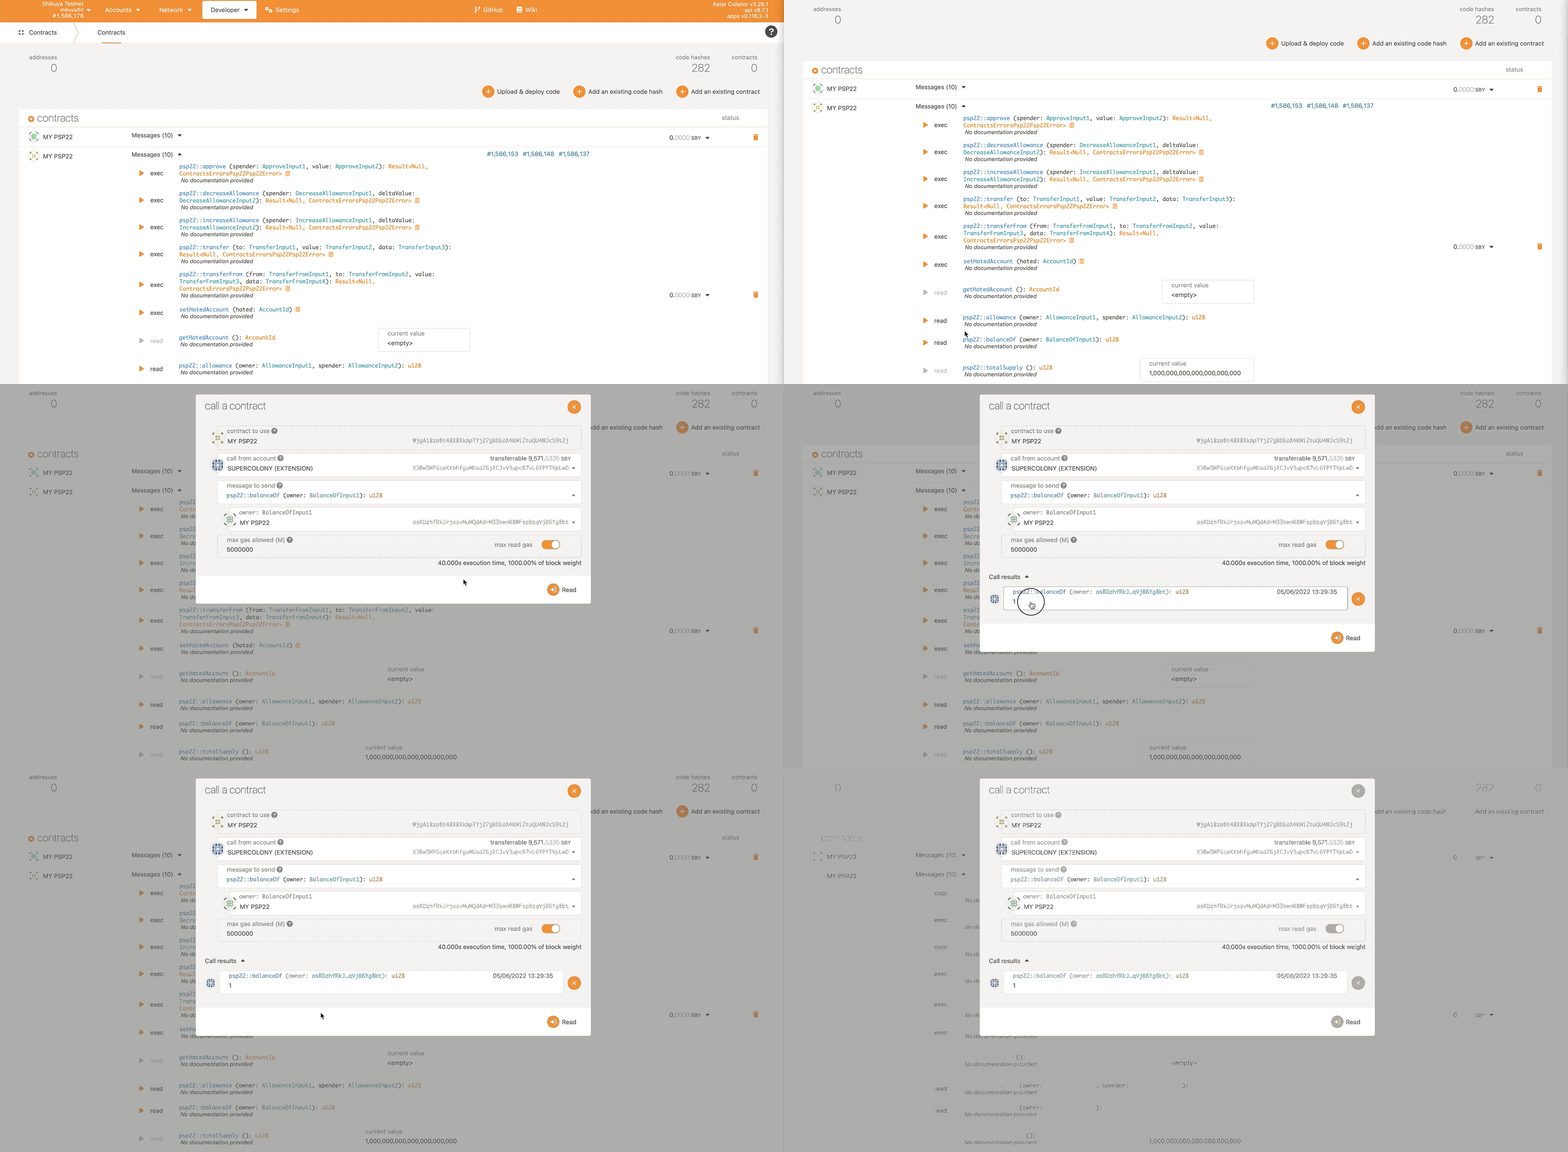
Congratulations, you deployed and test your first L1 Smart Contract to Shibuya network!